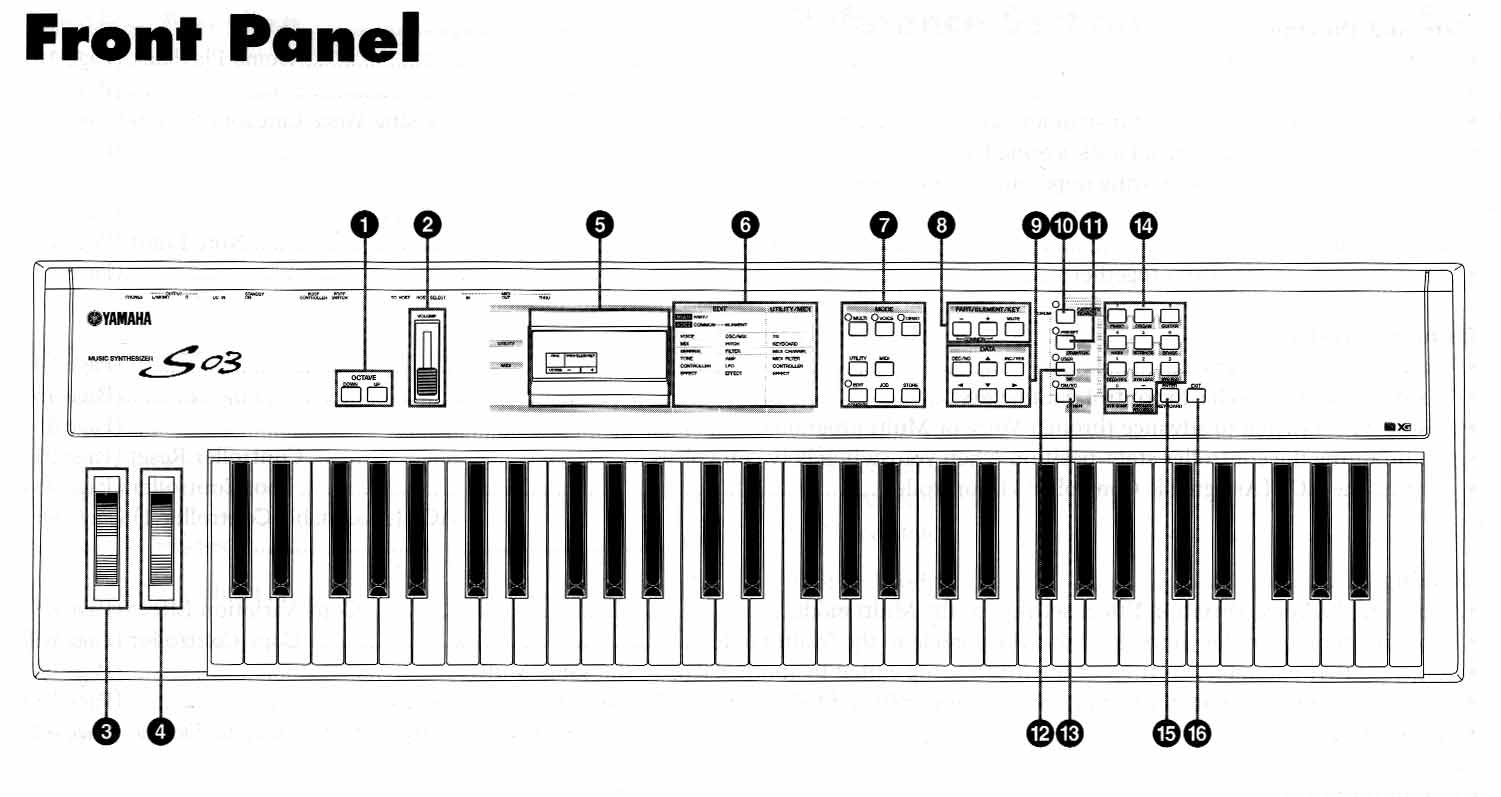
CONTROLS & CONNECTORS
| FRONT PANEL |
| REAR PANEL |
1. Octave up & down buttons
Press either of these buttons to shift the note range of the keyboard up or down in octaves.
Press them together to restore the normal range.
2. Volume slider
Adjust the master volume output from the OUTPUT L/R jacks
and the PHONES jacks. Move the slider upwards to raise the level.
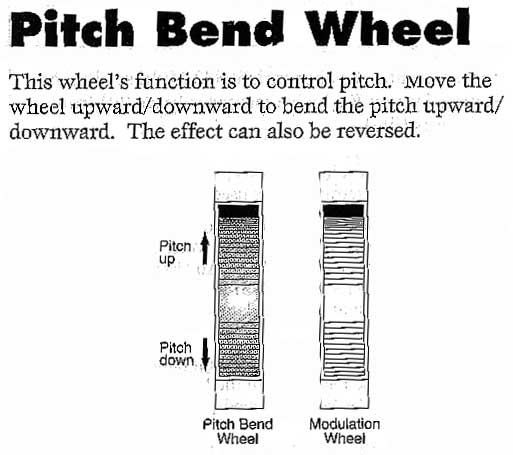
3. Pitch bend wheel
Controls the pitch bend effect.
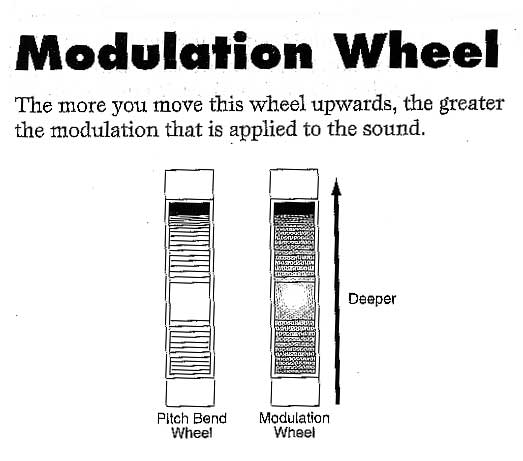
4. Modulation wheel
Controls the modulation effect. You can also assign other parameters and functions to this controller.
5. LCD
This backlit liquid crystal display displays various operation messages and information.
6. Parameter type list
Follow the arrow in the LCD across the appropriate column in the list:
the arrow indicates the type of the currently selected parameter.
7. Mode buttons
Press these buttons to select one of the modes: MULTI, VOICE, UTILITY or another mode.
8. [PART/ELEMENT/KEY] buttons
These buttons are used to select part/elements/drum keys in the MULTI edit or VOICE edit mode.
8.1 [+] and [-] buttons. In the MULTI mode these buttons select parts 1-16. In the multi part edit mode, press both of these buttons simultaneously to call up the common edit screen. To return to the part edit screens, press only one of these buttons.
In the VOICE edit mode, these buttons select elements 1-4 or the drum keys. In the VOICE element edit mode, press both of these buttons simultaneously to call up the common edit screen. To return to the element edit screen, press only one of these buttons.
8.2 [MUTE]. In the MULTI mode, this button mutes the selected parts.
In the VOICE edit mode, this button mutes the selected element or drum keys.
9. Data buttons
You can use these buttons during editing: for selecting various pages and setting parameter values.
9.1 [DEC/NO] button. Use this button to decrease the value of the selected parameter. The button can also be used to cancel a job a store operation.
9.2 [INC/YES] button. Use this button to increase the value of the selected parameter. The button can also be used to perform a job or store operation.
9.3 [s/t] buttons. Use these to select the screen pages in each mode
9.4___[3/4] buttons. Use these to select the value to be set in the LCD or to display continuous parts of the page.
10. [CATEGORY SEARCH/DRUM] button. Turns on the category search function. This function lets you instantly select the desired voice category from the numeric keypad or the memory buttons. You can also assign the drum bank of each memory by simultaneously pressing this button and the [USER] button or the [GM/XG] button.
11. [PRESET/(DRUM/PERC)] button. In the MULTI and VOICE modes, this lets you select the preset memory programs. When the category search function is active, this is used to specify the DRUM/PERC VOICE category.
12. [USER/(SE)] button. In the MULTI and VOICE modes this lets you select the USER memory program. You can also specify the USER memory drum bank by simultaneously pressing both this button and the [CATEGORY SEARCH/DRUM] button. When CATEGORY SEARCH function is active, this is used to specify the SE VOICE category
13. [GM/XG/(OTHER)] button. In the MULTI and VOICE modes this lets you select the GM/XG memory programs. You can also specify the GM/XG memory drum bank while simultaneously pressing this button and the [CATEGORY SEARCH/DRUM] button. When the CATEGORY SEARCH FUNCTION is active this is used to specify the OTHER: CO,ME VOICE categories.
14. Numeric keypad. This is used to select specific MULTI or program numbers. In the EDIT mode, it is used to input parameter data values. The selected value is actually entered or performed only after pressing the [ENTER] button. This is also used to select the various VOICE categories when the CATEGORY SEARCH function is on.
15. [ENTER/KEYBOARD] button. This is used to enter or perform the value typed in from the numeric keypad. This can also be used to set parameters whose values are expressed as a note; simultaneously hold this button and press the desired key on the keyboard. It is also used for performing various jobs and store operations.
16. [EXIT] button. During editing or in a mode (other than MULTI/VOICE play) pressing this button exits from the mode and returns to the MULTI/VOICE play mode.
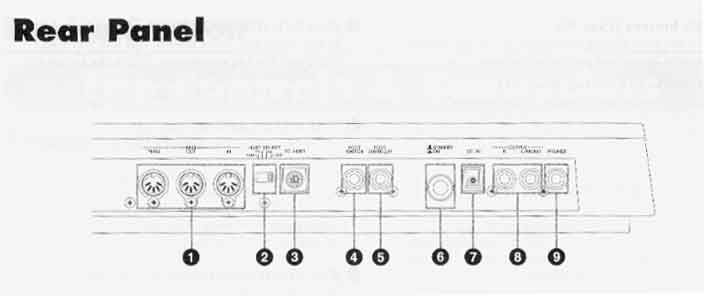
1. MIDI IN/OUT/THRU terminals. MIDI IN receives midi messages from an external midi device. Use this connector to control the S03 from an external midi device. MIDI OUT sends out midi messages generated by the S03 to an external midi sound module or device. MIDI THRU simply relays the midi messages received at midi in. Connect other devices here.
2. [HOST SELECT] switch. For selecting the type of computer connected to the S03 via the TO HOST connector. When using the MIDI IN/OUT/THRU terminals, set this switch to midi.
3. TO HOST terminal. For connection to a computer using an optional serial computer cable.
4. FOOT SWITCH jack. For connecting an optional foot switch. Depending on the assigned function, you can use the foot switch to turn specific functions on and off.
5. FOOT CONTROLLER jack. For connecting an optional foot controller. This gives you real time control over various aspects of the sound, such as tone, pitch and volume.
6. [STAND BY/ON] switch. Use this to turn S03 on or off.
7. DC IN terminal. For connecting an appropriate AC adapter to supply power to the S03.
8. OUTPUT L/MONO and R jack. Line level audio signals are output from the S03 via these phone jacks. For monophonic output use just the L/MONO jack.
9. PHONES jack. For connecting to a pair of stereo headphones.